Help:Image Tutorial
| Embryology - 27 Apr 2024 |
|---|
| Google Translate - select your language from the list shown below (this will open a new external page) |
|
العربية | català | 中文 | 中國傳統的 | français | Deutsche | עִברִית | हिंदी | bahasa Indonesia | italiano | 日本語 | 한국어 | မြန်မာ | Pilipino | Polskie | português | ਪੰਜਾਬੀ ਦੇ | Română | русский | Español | Swahili | Svensk | ไทย | Türkçe | اردو | ייִדיש | Tiếng Việt These external translations are automated and may not be accurate. (More? About Translations) |
Introduction
This image tutorial page contains uploading and formatting information. Some content has been modified from another Wiki Image Tutorial.
Before you Begin
Have you checked that the image can be reused on your page?
- Is it clearly copyright free or can be reused with correct citation.
- Look for a link to copyright information either at the bottom of the page or from website/journal information page.
- Do not assume you can reuse, just because you cannot find the copyright information.
- Always assume it is copyright, unless you can clearly identify that it is not.
- In some cases you can reuse after you have applied for permission.
- Links: Copyright Tutorial
Have you uploaded your image and renamed your image?
- Download the image to your computer.
- Use the left hand menu option "Upload file"
- Select your image off your computer by clicking "Source filename:"
- Rename the file in the window "Destination filename:".
- Add information about the file in the "Summary:" window, this can be much bigger that the few lines shown and can also be edited once the image is uploaded. Include your student number in this summary information.
You Will need to also fill in the image Summary window with information that will depend on the image source, see Image Sources. The minimum information is as follows (a more complete breakdown is shown in Image Sources).
- Image legend (usually a one line description you can use later as a caption.
- Original image legend from source.
- The full reference information as shown in Pubmed.
- Any copyright and/or reuse information shown on the source webpage, Book or Journal.
- Any permission and conditions for reuse you have received.
All images added by students must contain the following template in the image description. Simply copy and paste the text exactly as it appears in Read mode on the next lines.
- {{Template:2018 Student Image}}
Here is an example of an image (not student) that I have uploaded File:Mesoderm_cartoon_01.jpg
How can you use your new image?
- Open the page where the image will appear in edit mode.
- Select the location where the image will appear (see formatting notes below).
- Use the small picture icon at the top of the page to insert the Wiki code [[File:Example.jpg]] and replace Example.jpg with your image name.
- Fill in the "Summary:" field at the bottom of the screen with something like "added image Example.jpg to page".
- Save the page.
- The image should now appear on your page and its position will depend on any additional code you add, as shown below.
- The most common is the full size image or if too large then a thumbnail version, which automatically positions on the right hand side of your page.
- Clicking the image will open the image file, which will now show at the bottom of the screen pages linked to that image.
Where can I see all the uploaded image?
- Now that your image is uploaded you can see all Wiki added images from the Special:SpecialPages or directly at Special:NewImages
- This Gallery of new files shows chronologically from the latest added a thumbnail gallery of 48 images.
How do I delete an image?
- Contact (through their discussion page) the user who uploaded the image, telling them of your concerns. You may be able to resolve the issue at this point.
- Remove all uses of the image from articles make it an orphan.
- Contact the course coordinator with the specific image information. He can then remove the image from the site.
- Note students are unable to delete images, but they can remove all links to the image in question.
Links: Wiki Help:Images | Wiki Image Tutorial | Wiki Image use policy
Image Sources
You can either add the image information when you are uploading, or open the image and add the images information in edit mode in the text box beneath the image. Do this immediately when you upload, not at a later date. Uploaded images may differ in the associated text information depending upon source.
Remember the Course Handout information Academic Honesty and Plagiarism
- "For the purposes of this policy, submitting an assessment item that has already been submitted for academic credit elsewhere may be considered plagiarism. Knowingly permitting your work to be copied by another student may also be considered to be plagiarism. The inclusion of the thoughts or work of another with attribution appropriate to the academic discipline does not amount to plagiarism." (extract from UNSW statement on Academic Honesty and Plagiarism)
If the full size image appears on your project page, you must also include the reference/copyright information in the legend. All uploaded images must contain the following information in the associated text box.
Journal Images
Project images must be from journals that allow image reuse from articles or reviews. See also ANAT2341_References
- Include the original image legend text.
- A link to the original image URL (internet link).
- The full Pubmed Reference with a link to the article URL in Pubmed.
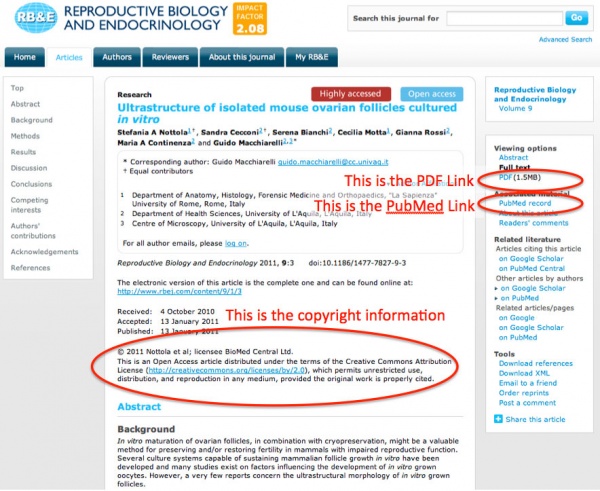
- If available, the direct journal link.
- Copyright information as shown within the article or review.
- Copyright policy of the journal.
You may also include any other relevant comments or information you feel appropriate.
References this page will give specific information on how to insert references on your Wiki page
PubMed Images - You can also search for PubMed images by adding the term "&report=imagesdocsum". You will still need to check the copyright information for the Journal/Article image source, as Some images are included as NIH author requirement or by original Journal agreement only with PubMed Central and cannot be reused in projects.
Internet Images
Do not assume that because an image is on the internet that you can simply reuse in your project. If you cannot find copyright information for the site, do not use the image.
- Do not simply google search and cite "Google" as the source.
- Some images from some government sites (USA, NZ) can be reused.
- Most Wikipedia images can be reused, but you should check their origin as well.
- Some educational sites may allow image reuse.
In all cases you must include:
- Any legend associated with the image.
- The image URL (internet link).
- The page URL (internet link) where the image appears in its original context.
- The author of the original image.
- The copyright conditions that allow you to reuse this image. If you cannot find this, you cannot reuse.
Your Images
- Remember the Course Handout information Academic Honesty and Plagiarism.
- Read also the section on how to make your own image.
Your group project must include at least one self-drawn image (drawing, flow diagram, etc) and you may include any other images you have drawn that you think are relevant. Do not simply redraw an identical copy of an existing image you have found, there must be something of your own in the figure. Copyright law grants copyright owners the exclusive right to control modifications of their works. If you add a new layer of material to a previously existing work, you have created a derivative work. If done without permission of the copyright owner you, may have violated the owner's copyright. Uploading your own image to the website is releasing your image as creative commons after publication and will allow reuse by others.
- A figure title.
- A full legend describing the image.
- If the image is based upon another's work (journal, internet) include the text "Based upon......" and include the information shown above for journal and internet images.
- Your identity (student number will suffice) but you may use your own name.
- A copyright statement:
"Beginning six months after publication, I (student number) grant the public the non-exclusive right to copy, distribute, or display the Work under a Creative Commons Attribution-Noncommercial-Share Alike 3.0 Unported license, as described at http://creativecommons.org/licenses/by-nc-sa/3.0/ and http://creativecommons.org/licenses/by-nc-sa/3.0/legalcode."
(MH - This 6 month delay means that no other current students may reuse your work)
Textbook Images
You cannot copy images from the online cell biology textbooks (Molecular Biology of the Cell, Molecular Cell Biology or The Cell- A Molecular Approach) to your project.
- You can include the content as an external link.
- Use an abbreviation of the journal title (MBoC, MBC, Cell) separated by a hyphen "-" and the figure title.
- Example: MBoC - Figure 3-26. Actin filaments
- This is what the above link looks like on your page in edit mode
[http://www.ncbi.nlm.nih.gov/books/bv.fcgi?&rid=mboc4.figgrp.432 MBoC - Figure 3-26. Actin filaments]
Uploading Image
1. Find an article in a journal that allows reuse of content
Check the conditions of reuse before you do anything.
If you are sure that you can reuse we can proceed (it is useful to open each link in a new tab to help with adding the information you need).
If you have looked for copyright information, but cannot find, do not upload, but contact the course coordinator who may be able to advise.
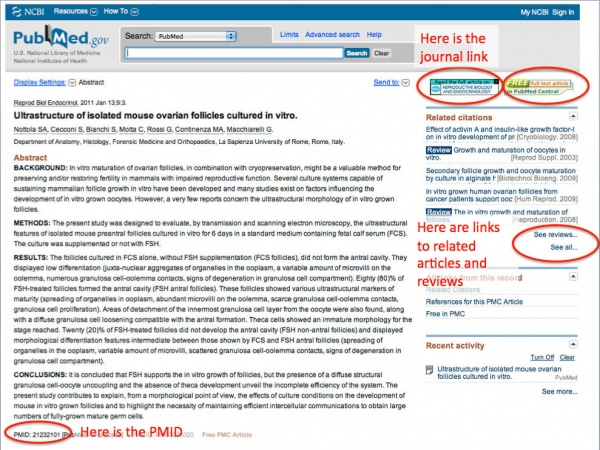
2. Here is an example of a paper in PubMed
Here is an example of a paper in PubMed From which I will add an image. http://www.ncbi.nlm.nih.gov/pubmed/21232101
3. Open the journal link in a new tab
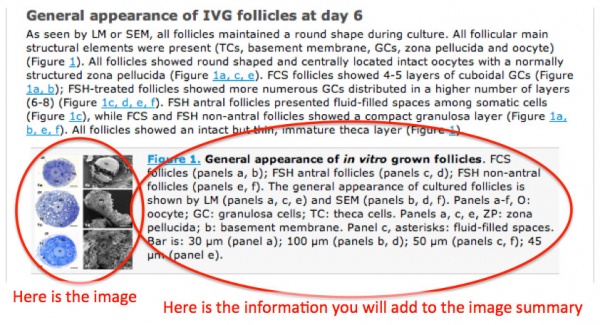
4. Here is the section within the paper
Open the image in a new tab.
Now download the image to your desktop.
5. Uploading the image
Open Upload file in a new tab.
Here is what the image upload window looks like. Now follow the numbered steps.
Image Formatting
In most cases only the image Name is required. Most images should use "[[File:Name|thumb|alt=Alt|Caption]]" and should not specify a size. The other details are optional and can be placed in any order.
- Type
- "
thumb" (or "thumbnail"), "frame" (or "framed"), or "frameless". Display the image with specific formatting (see below). - Border
- "
border". Put a small border around the image. - Location
- "
right", "left", "center" or "none". Determine placement of the image on the page. This defaults to "right" for thumbnails. - Alignment
- "
baseline", "middle", "sub", "super", "text-top", "text-bottom", "top", or "bottom". Vertically align the image with respect to adjacent text. This defaults to "middle". - Size
- "Width
px" or "xHeightpx" or "WidthxHeightpx" or "upright" or "upright=Factor". Scale the image to be no greater than the given width and/or height, keeping its aspect ratio. With "upright", scale a thumbnail from its default size by the given factor (default 0.8). - Link
- Link the image to a different resource, or to nothing.
- Alt
- Specify the alt text for the image. This is intended for visually impaired readers. See WP:ALT for how this typically should differ from the caption.
- Caption
- Specify the image's caption.
Image Layout on Your Page
Example 1 - Right align, float
Example 2 - Right align, float, with caption
You will usually put these at the start of a paragraph so the image floats to the right of the paragraph. It is common to see these at the start of an article.
Example 3 - Left align, float
Example 4 - Do not float
Framing, adding a caption. It is usual to include a caption to describe the image. This means that the image will need a "frame"
Thumbnailing
Let us say that picture is too big. Let us say we want the user to get a smaller version (a "thumbnail") when he/she looks at the article. Thumbnails always include a frame, so when thumbnailing, you almost always want to specify a caption. A thumbnail adds a gray border around a picture and lets you add a caption, like 'frame' above. See Wikipedia:Captions for caption writing tips. But "thumb" also automatically resizes a large picture into a smaller display size, with an option for the user to click on the image and see the original large version. Because different people work to different screen resolutions, your preferred size of thumbnails can be set in special:preferences under "files". The default, which is also used for logged-out users is 180 pixels (px), but you can choose between 120px, 150px, 180px, 200px, 250px, and 300px sizes. If an image is smaller than the thumbnail size you specified then it is displayed at 100% resolution, that is, at its natural size. Generally speaking, thumbnails are the best way to display images.
Resizing
Although thumbnails are preferred, you may want to display an image at a particular size. Starting without a thumbnail:
(Remember: Using a frame forces the picture to its original size, and overrides the use of the pixel width argument.) For example, let us say we want it to be 100 pixels wide:

Co-aligning like images
Gallery Tag
The basic gallery tag is an easy way to assemble images that you do not yet know where you want to locate them, but want them on hand for your project page. It assembles your images in small thumbnails with any text you want to add as their labels.
<gallery>
Place your image files between these 2 tags|This is the caption </gallery>
Note including with each image "alt=" with the caption title will help screen readers.
Other Gallery Types
There are now a number of newer gallery formats, they all still require the same closing tag. </gallery>
- No Lines Gallery
- <gallery mode="no lines" caption="put caption here">
- Packed Overlay Gallery
- The image captions sit open over the images all the time.
- <gallery mode="packed-overlay" caption="put caption here">mode=
- Packed Hover Gallery
- The gallery can hand a caption and the images are packed together. Individual image captions only appear when the mouse hovers over the image.
- <gallery mode="packed-hover" caption="put caption here">
Gallery Attributes
- caption="{caption}": (caption text between double quotes for more than a word) sets a caption centered atop the gallery.
- widths={width}px: sets the widths of the images, default 120px. Note the plural, widths.
- heights={heights}px: sets the (max) heights of the images.
- perrow={integer}: sets the number of images per row. 0 means automatically adjust based on width of screen.
- showfilename={anything}: Show the filenames of the images in the individual captions for each image (1.17+).
- mode={traditional|nolines|packed|packed-hover|packed-overlay}: See section above (1.22+).
Making Your Own Image
These notes will help you to prepare your own image for your group or individual project. Note that the group project requires the inclusion of at least one student drawn image (from the group), on the individual project page a student drawn image is optional. You may need to experiment a little to make your image easy to view and identify key components and text.
- There are a variety of free and commercial computer drawing programs that will allow you to draw your own images and then upload.
- Alternatively draw your own image on a sheet of paper and either scan or photograph your drawing and upload.
- You may need to change the size and resolution of scans or photographs before you upload.
- Do not forget to add the associated text information.
MH - If you upload an image that you do not use in your project, please notify Dr Mark Hill identifying the image name and it will be deleted. All unlinked images will be deleted.
Size and Resolution
The larger the size and the higher the resolution, the bigger the file size will be. The Wiki has a maximum file size limit and large files may take a long time to upload depending on your connection speed.
Size
- You can upload a single image at various sizes depending on how you intend to use in your project.
- The largest image size, by width (pixel, px) should be 800 pixels wide.
- The smallest image size should be 240 pixels wide.
Resolution
- The minimum image resolution (dpi) should be 72 dpi.
- You can use higher resolution (96, 144 dpi) if you wish but this is unnecessary.
- If you want a printable version, upload a 300 dpi image. Do not insert this version on any wiki page, add as a link "printable version".
Text
- Use sanserif fonts in your drawing as these appear clearer in labels and titles (Helvetica, Arial, etc).
- Do not use serif fonts (Times, Times Roman, Garamond, etc) as these are hard to read and clutter the image.
Lines and Colours
- In general, use thicker lines which when scaled will still be visible.
- Use basic (web safe) colours that contrast clearly with each other.
- Avoid coloured or patterned backgrounds.
Powerpoint
Nearly all students have used Powerpoint at some time to prepare a presentation. Did you know that you can use the drawing tools to draw a diagram or flow diagram on a blank slide and then export the slide as a jpg and then upload?
Powerpoint Hints
- Under "slide layout" select "blank".
- Use the "shapes" menu for all the basic drawing tools.
- Make your drawing fill the full slide.
- the full slide is saved as an image, so excessive white border will be a waste of space.
- Use "text box" to add labels.
- Use sanserif fonts which are clearer in drawings (Helvetica, Arial, etc).
- Do not use serif fonts (Times, Times Roman, Garamond, etc) as these are hard to read and clutter images.
- Save your slides as powerpoint before you export.
- Some powerpoint versions allow "Save as Picture" from the menu or use "Save as" menu and select JPEG from the pull-down menu.
- If you are familiar with powerpoint options, you can also now use the "options" menu to set image size and quality.
Open Office
- This free software has an easy to use both slide and drawing programs.
- Open Office "A multiplatform and multilingual office suite (word processing, spreadsheets, presentations, graphics, databases) and an open-source project. Compatible with all other major office suites, free to download, use,..."
Paint
- A simple graphics painting program that has been included with almost all versions of Microsoft Windows since its first release.
- formerly Paintbrush for Windows
iWork
- A suite of applications created by Apple, which contains Pages, a word processing and desktop publishing application; Keynote, a presentation package; and Numbers, a spreadsheet application
- Keynote ’09 can prepare slides like powerpoint and export as image files.
Photograph
- Use a digital camera, phone with a camera or built-in computer camera to photograph your drawing, and then upload to a computer.
- Edit the image, crop, size, resolution before uploading to Wiki.
- Note that most phone cameras may require some experimentation to get a reasonable quality image.
Bookmarking Your Image
Insert this code above where the image appears on your page, replacing "Image title" with your images's name.
<div id="Image title"></div>
You can then make link to the image from the same page by using the code below.
[[#Image title|Image title]]
References
Articles
External Links
External Links Notice - The dynamic nature of the internet may mean that some of these listed links may no longer function. If the link no longer works search the web with the link text or name. Links to any external commercial sites are provided for information purposes only and should never be considered an endorsement. UNSW Embryology is provided as an educational resource with no clinical information or commercial affiliation.
- NLM Openi open image searching at NLM.
- Biomedical Figure Search engine Figure search page
Glossary Links
- Glossary: A | B | C | D | E | F | G | H | I | J | K | L | M | N | O | P | Q | R | S | T | U | V | W | X | Y | Z | Numbers | Symbols | Term Link
Cite this page: Hill, M.A. (2024, April 27) Embryology Image Tutorial. Retrieved from https://embryology.med.unsw.edu.au/embryology/index.php/Help:Image_Tutorial
- © Dr Mark Hill 2024, UNSW Embryology ISBN: 978 0 7334 2609 4 - UNSW CRICOS Provider Code No. 00098G

