OK below is shown the examples I gave in today's practical class. You can of course cut n paste if you are having trouble on your own page.
Lab Attendance
--Mark Hill (talk) 13:45, 7 August 2015 (AEST)
Lab 2 - Images
| Uploading Images in 5 Easy Steps
|
First Read the help page Images and Copyright Tutorial.
- Hint - This exercise is best done by using separate tabs on your browser so that you can keep all the relevant pages easily available. You can also use your own discussion page to copy and paste links, text. PMIDs etc that you will need in this process.
- Find an image .
- Search PubMed using an appropriate search term. Note that there is a special library of complete (full online) article and review texts called PubMed Central (PMC). Be very careful, while some of these PMC papers allow reuse, not all do and to add the reference link to your image you will still need to use the PMID.
- You can also make your own search term. In this link example PMC is searched for images related to "embryo+implantation" http://www.ncbi.nlm.nih.gov/pmc/?term=embryo+implantation&report=imagesdocsum. simply replace "embryo+implantation" with your own search term, but remember not everything in PMC can be reused, you will still need to find the "copyright notice" on the full paper, no notice, no reuse.
- Where else can I look? BioMed Central is a separate online database of journals that allow reuse of article content. Also look at the local page Journals that provides additional resources.
- You have found an image, go to step 2.
- Check the Copyright. I cannot emphasise enough the importance of this second step.
- The rule is unless there is an obvious copyright statement that clearly allows reuse (there are several different kinds of copyright, some do not) located in the article or on the article page, move on and find another resource. Not complying with this is a serious academic infringement equivalent to plagiarism."Plagiarism at UNSW is defined as using the words or ideas of others and passing them off as your own." (extract from UNSW statement on Academic Honesty and Plagiarism)
- You have found the statement and it allows reuse, go to step 3.
- Downloading your image.
- Download the image to your own computer. Either use the download image on the page or right click the image.
- To find the downloaded image you may have to look in your computer downloads folder, or the default location for downloaded files.
- The image file will have its own original name, that you will not be using on the wiki. You can rename it now (see renaming below), but you should also make a note of the original name.
- Make sure you have everything ready then for the
- You have the image file on your computer, go to step 4.
- Uploading your image.
- First make sure you have all the information you want to use with the file readily available. There is also a detailed description below.
- Towards the bottom of the lefthand menuunder “Toolbox” click Upload file. This will open a new window.
- In the top window "Source file", click "Choose file" and then navigate to find the file on the computer. and select the image.
- If you have done this correctly the upload window will now have your image file shown in choose file and also in the lower window "File description" in "Destination filename:" DO NOT CLICK UPLOAD FILE YET.
- Rename your file in "Destination filename:" this should be a brief filename that describes the image. Not any of the following - the original file name, image, file, my image, your ZID, etc. Many of the common embryology names may have already been used, but you can add a number (01, 02, 03, etc) or the PMID number to the filename to make it unique.
- If the filename or image has already been used or exists it will be shown on the upload page. If another student has already uploaded that image you will have to find another file. Duplicated images will not receive a mark, so check before you upload as you cannot delete images.
- In the "Summary" window for now just paste the PMID. You will come back and edit this information.
- Now click "Upload image" at the bottom of the window, go to step 4.
- Edit and Add to your page.
- Edit - Open the image with the "Edit" tab at the top of its page. You should see the PMID you had pasted earlier in the new edit window. Add the following information to the summary box.
- Image Title as a sub-heading. Under this title add the original figure legend or your own description of the image.
- Image Reference sub-sub-heading. Use the PMID link method shown in Lab 1 and you can also have a direct link to the original Journal article.
- Image Copyright sub-sub-heading. Add the copyright information under this sub-sub-heading exactly as shown in the original paper.
- Student Image template, as shown here {{Template:Student Image}} to show that it is a student uploaded image.
- Add - Now add your image to your own page under a subheading for Lab 2 Assessment including a description and a reference link. If still stuck with this last step, look at the example on the Test Student page.
- Done!
Students cannot delete images once uploaded. You will need to email me with the full image name and request deletion, that I am happy to do with no penalty if done before I assess.
Non-Table version of this page
|
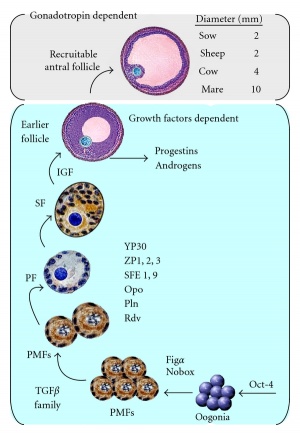
Model of Follicle Development[1]
PMID 22666170
Lab 1 - References
PMID 26244658
Look at this article on fertilisation.[2]
References
Here's the reference list
Things I did not show in the practical
As always I ran out of time here are a few interesting things to look at. Don't forget you need to look at the page in edit mode to see how it all works.
If I add <nowiki></nowiki> you can see the code without the code actually working.
Here is an example <pubmed limit=10>Fertilization</pubmed>
Here is the code working. FYI it is showing the 10 most current reference articles in PubMed database related to "Fertilization".
<pubmed limit=10>Fertilization</pubmed>
- 2015 Course: Week 2 Lecture 1 Lecture 2 Lab 1 | Week 3 Lecture 3 Lecture 4 Lab 2 | Week 4 Lecture 5 Lecture 6 Lab 3 | Week 5 Lecture 7 Lecture 8 Lab 4 | Week 6 Lecture 9 Lecture 10 Lab 5 | Week 7 Lecture 11 Lecture 12 Lab 6 | Week 8 Lecture 13 Lecture 14 Lab 7 | Week 9 Lecture 15 Lecture 16 Lab 8 | Week 10 Lecture 17 Lecture 18 Lab 9 | Week 11 Lecture 19 Lecture 20 Lab 10 | Week 12 Lecture 21 Lecture 22 Lab 11 | Week 13 Lecture 23 Lecture 24 Lab 12 | 2015 Projects: Three Person Embryos | Ovarian Hyper-stimulation Syndrome | Polycystic Ovarian Syndrome | Male Infertility | Oncofertility | Preimplantation Genetic Diagnosis | Students | Student Designed Quiz Questions | Moodle page
Glossary Links
- Glossary: A | B | C | D | E | F | G | H | I | J | K | L | M | N | O | P | Q | R | S | T | U | V | W | X | Y | Z | Numbers | Symbols | Term Link
Cite this page: Hill, M.A. (2026, April 19) Embryology Test student 2015. Retrieved from https://embryology.med.unsw.edu.au/embryology/index.php/Test_student_2015
- What Links Here?
- © Dr Mark Hill 2026, UNSW Embryology ISBN: 978 0 7334 2609 4 - UNSW CRICOS Provider Code No. 00098G
