Talk:ANAT2341 Lab 2 - Online Assessment
Gastrulation Image
PMID /27097030
Gastrulation EMT Is Independent of P-Cadherin Downregulation
http://journals.plos.org/plosone/article?id=10.1371/journal.pone.0153591
Lab 2 Assessment 2015
- Upload a research image using the guide information below. The image uploaded for your individual assessment can relate to your project or from fertilisation to week 3 of development (upload only a single image).
- Add that image to your own individual page (see Images).
Uploading Images
First Read the help page Images and Copyright Tutorial.
The following describes how to upload an image with all the information that must be associated with it.
The image must first be uploaded to the site.
- Open the left hand menu item “Toolbox” and click “Upload file” and a new window will open.
- Click the button ”Choose file” and navigate to where the image is located on your computer and double click the file.
- The window will now show the file name in the “Source filename” window.
- You can then rename the uploaded file in the “Destination filename” window.
- Make sure the new name accurately describes the image.
- Add a description of the image to the “Summary” window (this information can also be added after you have uploaded the file). Note the description must include:
- An image name as a section heading.
- Any further description of what the image shows.
- A subsection labeled “Reference” and under this the original image source, appropriate reference and all copyright information.
- Finally a template indicating that this is a student image. {{Template:Student Image}}
Images not including the above information will be deleted by the course coordinator and be considered in the student assessment process.
Students cannot delete uploaded images. Contact the course coordinator with the file address.
The image must then be added to your page.
Image Example
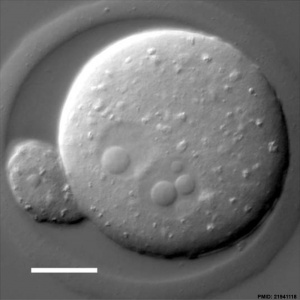
Here is an example of a recent image I have uploaded with all the associated information (except the student image template). Click the image to see the information associated with it.
DIC Image of an early mouse zygote containing two pronuclei[1]
Example Image Code
Below is shown the code required for the above image and reference to appear on this current page (you could also see this by viewing this page in edit mode).
[[File:Mouse_pronuclei_01.jpg|300px]]
DIC Image of an early mouse zygote containing two pronuclei<ref><pubmed>21941118</pubmed>| [https://www.landesbioscience.com/article/17250/full_text/#load/info/all Nucleus]</ref>
<references/>
Lab 2 Assessment 2014
- Upload a research image using the guide information below. (See Copyright Tutorial with regard to content that can be used in your project). The image uploaded for your individual assessment can relate to your project or fertilisation or early development to blastocyst stage (upload only a single image).
- Add that image to your own individual page (see Images).
Uploading Images
First Read the help page Images and Copyright Tutorial.
The following describes how to upload an image with all the information that must be associated with it.
The image must first be uploaded to the site.
- Open the left hand menu item “Toolbox” and click “Upload file” and a new window will open.
- Click the button ”Choose file” and navigate to where the image is located on your computer and double click the file.
- The window will now show the file name in the “Source filename” window.
- You can then rename the uploaded file in the “Destination filename” window.
- Make sure the new name accurately describes the image.
- Add a description of the image to the “Summary” window (this information can also be added after you have uploaded the file). Note the description must include:
- An image name as a section heading.
- Any further description of what the image shows.
- A subsection labeled “Reference” and under this the original image source, appropriate reference and all copyright information.
- Finally a template indicating that this is a student image. {{Template:Student Image}}
Images not including the above information will be deleted by the course coordinator and be considered in the student assessment process.
Students cannot delete uploaded images. Contact the course coordinator with the file address.
The image must then be added to your page.
Image Example
Here is an example of a recent image I have uploaded with all the associated information (except the student image template). Click the image to see the information associated with it.
DIC Image of an early mouse zygote containing two pronuclei[1]
Example Image Code
Below is shown the code required for the above image and reference to appear on this current page (you could also see this by viewing this page in edit mode).
[[File:Mouse_pronuclei_01.jpg|300px]]
DIC Image of an early mouse zygote containing two pronuclei<ref><pubmed>21941118</pubmed>| [https://www.landesbioscience.com/article/17250/full_text/#load/info/all Nucleus]</ref>
<references/>
